Tables in Pressbooks
This article will provide information on creating tables in Pressbooks.
Creating a Table
In the chapter editor, click the table icon in the bottom row, all the way on the left

If you don't see this icon, enable the full formatting toolbar with Shift+Alt+Z (Control+Option+Z on Mac).
- Choose the table size in "Table ⯈"
- Once the table is added, you can add formatting as you normally would, such as headings
Adding a Header Row
One of the best ways to improve table readability is to add a header row. You can do this by selecting a row and clicking the table icon, then navigate to Row > Table row properties > Row Type and select "Header".
If you want the the header row to be shaded, you can set the Class to "Shaded". You may want to make the text bold too.
By doing the previous steps, you end up with a header row that looks like this (in the McLuhan theme):
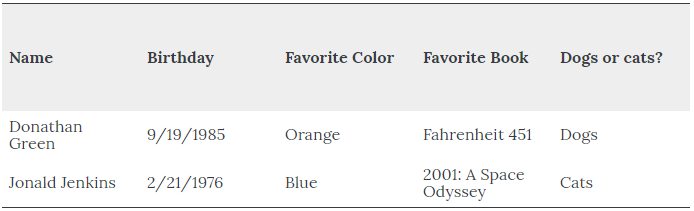
Table Properties
To access the table properties, you should move your cursor to the table and click the table icon, then select "Table properties". You will be able to make the following changes:
- Adjust the width and height of your table
- Adjust the cell padding and cell spacing
- Increase or decrease the weight of the border
- Add a caption
- Change the alignment
- Change the class
Sizes
Width
Width is set as a percentage of the page size or as a pixel value. For digital versions of your book with the width set by percentage, the table will be responsive. This means that the table will adapt to the size of the device it's being viewed on, allowing all users to read the table equally easily. If the table width is set with pixel values, it will not be responsive. By default, the width is 100% of the page.
Height
Height, in contrast to the width, is only measured in pixels. There is a minimum value that you can't go below which changes depending on the number of rows. If the height is higher than necessary, it will spread out the table with each row's height being increased equally.
Border Weight
You can change the weight of the borders by changing the number next to the "Border" label. This will change the borders on the left and right sides of the table, not the individual cell borders.
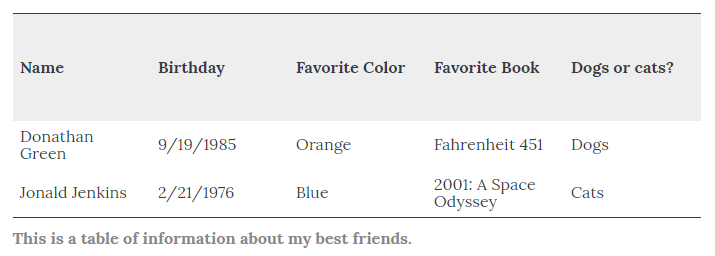
Table Captions
You can enable a caption by selecting the checkbox next to the "Caption" label. This will allow you to add a caption to the bottom of the table in the web view, although the in the editor and in the ebook and print versions it will appear above the table.
Example
In the editor, a caption would appear this way:

In the web version of the book, this table appears like this:
Alignment
You can change the alignment of your table using the "Alignment" dropdown menu in the Table Properties menu. Body text will automatically wrap around the table.
Classes
All tables default to the Standard class. You can choose from one of four classes:
- Standard
- No lines
- Lines
- Shaded
Have an issue or article suggestion?
Email us! lts@boisestate.edu